Monday, December 25, 2023

Learn the PMTS "Phantom Move" from Marcel Hirscher!

The brilliance of Marcel Hirscher has never been in question!

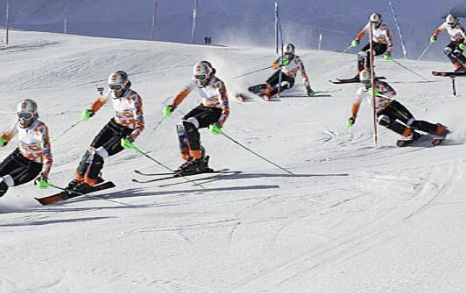
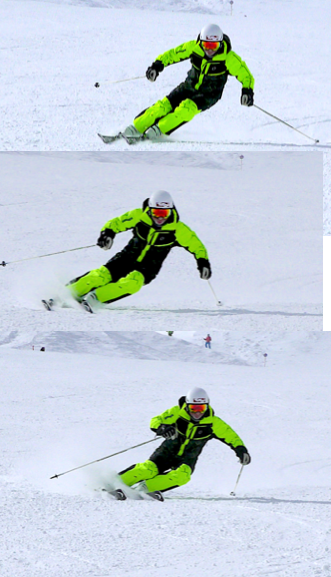
In this sequence of photos, I'll explain one of the many technical movement patterns that served Hirscher well during his racing dominance.
This is a typical Hirscher turn with lower body tipping angles.

Hirscher's release of the turn began with his bending and retracting of the stance leg. This is the exact movement I describe in my first book as the "Phantom Move". I wrote my book well before, Hirscher appeared on the scene. before I knew Hirscher existed or saw him ski. He is the perfect PMTS skier. My book was a best-seller, but highly criticized by PSIA and instructors, for this radical approach and description of how you could learn to ski. My book gave regular skiers access to learning World Cup skier movements. These movements are totally contrary to what is taught in traditional ski instruction.

Here he lifts the tip of the stance ski and the transfer to the new ski is completed. Notice how the old stance leg knee (the new inside knee) is lifted higher than the new stance leg knee. When recreational skiers achieve this movement, it creates a huge breakthrough in their skiing.

The lifted ski then becomes the ski that is aggressively tipping first toward the little toe edge side of the ski. This is pure PMTS, from the "Anyone Can Be an Expert Skier", book.

Tipping the new inside ski continues to lead the angle development for the new turn. He has completed the float phase of the transition.

The knees show which foot and ankle Hirscher is focused on tipping to prepare for the forces and load coming up to the outside ski in this turn.


Monday, December 18, 2023

The World Cup Season is in Full swing. What is big and what isn't, misconceptions already abound!


Misconceptions I've already read and heard from analysts in the 2023 season. 

"Odermatt extends in his GS skiing." This is one of the biggest misconceptions out there in ski technique. He never pushes off to extend, and just using that wrong terminology can set back a development skier for years.


If you look at this release and think it's an extension you better go back and change your instructor manual.


                                                  This is just before he releases. 


                      Here again, Odermatt uses the classic retraction, bend, flex, release. 

Sure there is an extension in skiing and one leg gets longer than the other, but not by pushing into the snow, against the snow, therefore lengthening the leg. The most important thing people should have learned from Hirscher is to transition without pressuring the skis (the float). That is why we call the transition a float across and a change of edges with no pressure on the skis. A retraction release is the GOLD Standard in performance skiing. Odermatt accomplishes this by using a strong retraction of the legs using the energy he created from the forces of the turn and the bend of the ski.

Wednesday, August 30, 2023

Skiing dynamically means limit folding at the waist even for expert skiers.

Hip Collapsing robs angles, ski bend, and tip engagement!

Even expert skiers can be seen collapsing their hips to reduce pressure. When the timing and correct movements of leg retraction and counteracting aren't coordinated or are miss-timed that's the result.


This is an expert skier, however, this skier is giving up fore-aft balance and power because the timing of collapsing the hips is too early. This reduces tip pressure and also moves the hips back on the skis. 


If you look at the outside right hip it is open and there is no folding or lowering from the hip. The hip is driving forward to keep the tip leading the arc.


Here you can see the change in hips more extended to hips more collapsed. This results from a lack of counteracting of the hips or staying too square to the skis.


The comparison shows the obvious benefits of keeping the hip and torso up and driving forward. The result is more power in the ski, more tips leading the turn, and higher angles.

Again notice the left hip Counteracted, this gives you more control of the turn and more versatility for a change of angle and turn size without skidding.

Tuesday, March 21, 2023

Different turns by Odermatt in GS.

This turn by Odermatt shows a strong retraction release. Many analysts would like to point out that Odermatt uses an extension to exit his turns. Nothing could be more false in their analysis. It is incorrect and he doesn't use an extension to exit his turns. That kind of incorrect analysis is pervasive in ski coaching, ski instruction, and teaching. This turn clearly demonstrates a decrease in leg length (bend the legs to release) to access the new angles for the next turn.

Here Odermatt is well positioned coming under the gate ready to begin his movements to start the next arc.


Using a full bending of the legs to absorb the turn angles and forces, Odermatt uses retraction and absorption to put his skis flat on the surface in transition. A retraction or leg bending release reduces the pressure on the skis, making them light often both skis are pulled off the snow when the retraction movement isn't forceful or timed fast enough to keep snow contact. During this period in a transition changing ski angles and engagement is much enhanced due to the lack of resistance of the skis to the snow.
The transition is comprised of a leg bending movement to release pressure and edge angles from the previous arc, while the skis are light the feet can be tipped to the new angles for the next turn. This is a typical flexing retraction release and is most effective for steep slopes and tight turns.

Thursday, February 23, 2023

You won't fool yourself or cheat in "Pure Carved Turns" if you know this simple rule!

I often show my students how to determine if they are pivoting, hip thrusting, or extending too much into the new turn by showing them this very simple "tell".


This is a turn completion which is at the bottom of the arc that requires bending and or retraction of the feet and knees to link a new pure carved turn.


In the frame below, the transition to the new edges has begun; the retraction (bending the outside knee and leg) isn't yet completed on the lower or outside leg to match the knee bend of the upper leg.

Now the retraction is complete demonstrated by both knees bending equally and the skis flat to the snow surface.

Now we are at the "CRUX" of the matter. This frame is the "High C" part of the initiation. It point in an arc tells you if you are truly carving or faking. If the tails of the skis go uphill at this point you pushed yourself out of the previous turn and you would see snow spraying off the skis. Other reasons the tails of the skis might go uphill are, that you used too much hip thrust to counter your body or you pivoted your feet while the skis were flat. If the tails follow the tips without a snow spray coming off the tails you have tipped your lower body properly onto a new set of edges and your skis are set on new edges. Your skis are set and have angles that develop for the new turn.

The movements that continue to develop a carved high-edge angle turn are inside ski tipping, leg bending, and hip relaxation. The result is a purely carved turn that leaves only two finely described circular edge lines showing an arc in the snow.
The upper body's role in this is to increase and create counteracting appropriately for the position of the skis to the falline.
 

Sunday, December 25, 2022

Power up your skiing using Richie Berger as a model!

In this series of photos and with the text added, I explain the development of high-energy turns used by the world's best skiers. As with all PMTS skiing, the angles are developed through relaxation and inside foot, leg, tipping, and inside leg shortening, or bending.

In my Books and Videos "Anyone Can Be an Expert Skier 2 and "The Essentials of Skiing";  I explain in detail how this changes your skill levels and ability to ski all turns and terrain. The PMTS teaching System was developed well before either Richi, or Marcel Hirscher were known to me, however, they both ski perfect PMTS technique.  My books were published before I knew Richi Berger or before Marcel Hirscher won his first World Cup race. Every movement and body change shown here is exactly as I have explained in my books, although my books and videos go into much more detail for learning these exact skiing traits.


With the energy stored in the ski and the potential rebound developed from the previous turn this amount of inclination is possible as long as you have the skills to stay balanced, which are described in the next frames. If your release timing is too late or your outside ski balance and angles aren't creating enough hold and carve, start your counterbalance earlier in the turn.

Here you can see how all great skiers increase counteracting and counterbalance as the turn comes to the finish. All world cup slalom racers show the same movments.

The blue arrow demonstrates he has increased his upper body and hip counteracting. Notice that the pole tip has moved forward, his shoulders have leveled with his increase in Counteracting and Counterbalance. He is also starting to bend and relax his outside for leg shortening or bending to begin his release.


Notice that by the time Richie releases, his shoulders have come to level, and his hip counteracting is still held strong. This is the act of holding the CA and releasing the feet, knees, and skis for the transition.


Conparison: By the falline (skis pointed straight down the hill) there is a slight inclination in my turns as well as Richie's. However, if you understand the difference between dumping the hip into the arc first, verses tipping the feet, ankles and skis first, these two frames clearly show the result of the knees and legs moving first that result in these angles developed. 

Follow-up notes: Don't be fooled by how easy this looks. It may also look like the movements are subtle, small or require little effort or exaggeration. I can tell you from having worked on these movements for decades these movements are not subtle, they require full engagement and commitment. 


Friday, November 18, 2022

Skiing at the highest level: How to Transition with Fore/aft Balance preparation.

       The PMTS Transition as applied by World Cup racers.


All skiers at any level can learn to use the World Cup PMTS Transition. We teach this at our Harb Ski Camps to all levels of skiers. Does everyone get it into their skiing immediately? Sometimes yes, however, even if you don't get it right away, learning this sets you up for success and ongoing improvement to your skiing.

The sequence below shows the results of correct movements are used by David Ryding who's slalom technique closely resembles Marcel Hirscher's skiing. Observe the changes made in how the old stance ski or outside ski is lifted. Fig. 1 Bend the leg and pull the ski off the snow. Fig.2 Free the whole ski from the snow and transfer balance to the other ski while it is still tipped to it's little toe edge side. Fig. 3 the arrow tells the story, pull the lifted foot back while tipping it to the new edge. The LTE. (Little toe Edge) You can use and identify for yourself if you are properly executing this series of movements by the lifted ski's position. At the release the tip is up higher, by the transfer the ski is level to the snow, when you pull the ski back the tail is off the snow and the tip should be touching the snow. 

Fig. 1 The Release
Fig. 2 The Transfer
Fig. 3 The foot and ski pull-back

 A skilled coach will approach this teaching one small step at a time, skiing slowly. The idea at first isn't to produce a perfect turn. In fact, it preferable to not be concerned about the quality of the turn, it is more important to focus on the movements that create this transition.


The Release
Bend the outside leg and lift the ski off the snow.


Transfer balance to the uphill little toe edge side of the ski.

Pull the lifted foot and ski back under the hip until the back of the ski is lifted more than the tip.

Once you have a good sense of the lifting and pull-back movements then you can add the timing for the double pole tap.
Notice the hand position. He is about to tap the snow with both poles at the same time. This triggers the foot pull-back

Double pole tap timing.

Thursday, October 27, 2022

Leg and bone curvatures for skiers, greatly influence your edge holding ability!


One of the realizations we noted studying ski racers for 50-plus years and performing alignment assessments for 40 years is the differences in bone curves and how they influence skiing biomechanics. 

For the layman all you have to do is look at this photo to see the curve in the shin; this is a high tib-fib varum. Few experts, even those that deal with anatomy or foot alignment like podiatrists, differentiate between this curve and the standard bowed legs. Both are curves in the shin however in skiing they have and should be addressed differently for optimizing boot setup or alignment. 

In this photo, the knee mass is lined up with the ski edge rather than with the center of the foot. As the suits and ski pants became tighter in fit around the lower leg and shin, leg curves become more apparent. Not all shin curves are the same and they all affect your skiing technique and ability to hold an edge differently. You might even say that there is a certain predisposed natural selection for success based on an ideal leg curve for ski racing. Going back as far as Pirmin Zurbriggen, his high tibial varum was obvious to us and so was his skiing success, that correlation repeats itself with a high percentage of successful ski racers.


The biggest part of this curve is near the top of the shin.


How do we treat the differences between a lower tibia varum coming out of a ski boot compared to a high tib-fit varum as shown by the skier in the photo? The low curve is optimized by cuff adjustment, the overall curve as in the graphic below is adjusted mostly with under-boot canting and high tib fib varum mostly requires only fine-tuning of both boot components. (this is also always influenced by ankle and foot range of motion capability)


A perfect example is Erick Schlopy, a bronze medalist at the world championships. His high tib-fib varum needed no under-boot canting and only slight cuff adjustment. However, due to his rigid strong foot and ankle, our boot board modifications significantly improved his edging ability.

This type of optimization requires a complete assessment of all functioning moving parts that influence skiing. The ankle and foot lateral inversion and eversion movement capability and the ski boot's influence on foot/ankle movement included, including all of these measurements must be taken into account before adjustments can be finalized.

As you can see by this graphic from the Cleveland Clinic, which has been treating lower leg deformities and creating footbeds for these conditions for 100 years, no reference is made to bow legs being part of a shin curve. This graphic illustrates a bowed leg condition based on Retroversion in the hips rather than a shin curvature. 


This is an example of the commonly understood bowlegged low-shin curve anatomy.

Thursday, September 15, 2022

Skiing with the emphasis on the inside half of the body to create movements.

Inside foot and leg Movements

PMTS Direct Parallel is the proprietary teaching system invented by Harb Ski Systems. It is built on the fundamental that the movements of the inside half of the body in a turn, build a turn and is the basis for modern ski techniques and efficient skiing movements. The post below on my Blog Spot demonstrates how the body is split and where movements that create great angles and carving originate. 

Where you can find PMTS Direct Parallel Techniques
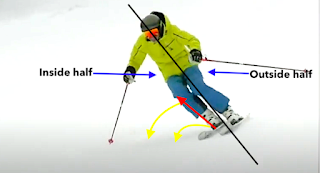

Starting with my book "Anyone can be an Expert Skier" copyright 1998, I described the inside foot movement called the Phantom Move. In my follow-up books, Expert Skier 2 and "The Essentials of Skiing" I elaborate on and dissect how the inside half of the body is moved so all levels of skiers, on any snow can achieve success. 

Sounds simple enough, however, this is completely opposite to traditional teaching and when done in the right order with the correct movements it will completely change your skiing. So if you want to learn the modern ski technique, this is the only complete system in the world that has proven over 25 years and with thousands of skiers that it's a game changer.

PMTS Fore/Aft movements keep you ahead of the turn.

Single or double foot pull back are the keys to staying in fore/aft balance.

Every skier on the world cup has the ability to do Dolphin Turns. This is the most advanced form of "Two Footed-pullback. However, to teach this we begin with the easy first steps which are very effective.


I hear this advice from race coaches/ski instructors either in written advice, in videos, or on the training course, "Get your hips Forward". Yes, that would be nice, however, there are no "pull your hips forward muscles" in the whole body. Rarely does that advice get results that can be used turn after turn? 

If you use a different approach that activates the hip forward result you can use it simply and quickly for every turn. This movement advice was also pioneered by Harb Ski Systems. We teach this at our camps using a progression with the "Foot Pullback" approach. 

Starting this movement right at the release of the old turn sets you up for a good Fore/aft balanced turn every time. In the photo above you see Petra using this exact movement with both feet. She lands perfectly balanced and forwards on her skis. We teach this using a one-foot pullback at the beginning. With the approach you don't have to be an expert, all levels of skiers can use it and benefit from this movement series.


Monday, May 16, 2022

Build a turn with inside ski tipping movements.

When asked what I focus on in a series of turns or a ski run, this is how I describe my approach. It usually surprises people.


The inside half of the body creates efficient movements and angles, not the drive for pressure on the outside leg and knee. 


Focus on the inside half of the body that creates the next turn.


                                              Starting out I split or divide my body in half. Study these photos. Since I know that the initiation of a turn involves a release of the old outside ski of the last turn; I focus on that half of the body which will be on the inside of the next arc. I always think in the future, not in the moment which always triggers my next turn. 


Here the black arrow is on the inside foot tipping movement that is the focus. 

This inside foot tipping movement should be accomplished as you also bend or shorten the inside leg. Also, the movement that keeps you forward in your skiing is the "foot pull-back" which is accomplished with the unweighted inside foot.

When you begin to realize you can simplify your thoughts and movements by focusing on only the half of the body that creates the next result; you can stay ahead of the disruptions a slope can deliver.


Thursday, April 7, 2022

Quick and powerful short turns!


This photo is from a series of short turns on really steep. Notice the full-body angles, compared to the "Lower Body" angles in the photo below.


This video demonstrates the way you develop short turns without an extension or push against the snow at the rlease.


A "lower-body" short turn shown here, is less risky and should be the first one you work on.


Friday, April 1, 2022

Turn Timing and Preparation in very short turns!

Pole and arm use and preparation are rarely taught, understood, or used properly. The lack of this understanding can hold your skiing back for years. 12 years ago I embarked on a skiing development that evolved into changing my technique and my turn timing. The end result is what I call "The No-swing Pole Tap. This is what we teach in our PMTS system.


This photo demonstrates pole preparation in place immediately near the "Apex or just after the skis in the falline. When you achieve this timing you never feel rushed and the upper body is stable without creating rotation or leaning movements. This is substantiated by the strong position of the inside pole and arm. 

When this pole prep isn't ready by the point where the blue arrow is shown in the red arc, the upper body swings quickly and detracts from ski angle, edge hold, and turn quality. Most skiers use too much pole swing because they drop the pole behind the body while dropping the arm and pole to the inside of the arc.


A strong inside half of the body is shown in this photo, which compliments the early pole preparation.