Monday, December 20, 2021

Consequences for World Cup skiers when cuff alignment isn't matching the leg curve.


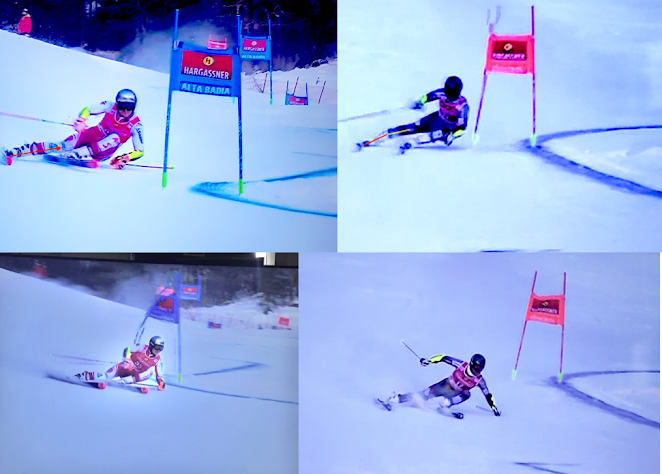
On the left is a newcomer to the top 5 in a World Cup GS race at Alta Badia. On the right is a veteran racer who has numerous top 5 results in his career but is now struggling. These comparison photos are two different turns, but the point isn't about the turn it's the leg to boot angles and the consequences. The times for the run support the result from what happened on all the turns where the racer on the right showed a lack of edge angle and ski edge holding ability.


 The top right photo shows the difference in ski and boot angle to the surface. There is a definite lack of boot angle compared to the leg and knee angle with the skier on the left. The consequences are shown in the lower right comparisons. Although this is a one-turn example, this occurred numerous times in the difficult offset turns in both runs. These two racers are on different boot companies. 


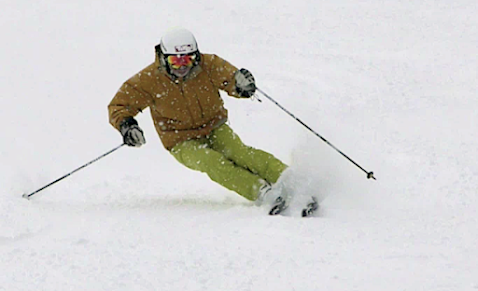
The photo below shows a new racer who put up an excellent performance with a good result, on the same boot company as the racer at the top right. Some racers obviously fit the manufacturer's
boot angles better than others, or the techs did a better job setting up the boots for the skier in the lower photo.


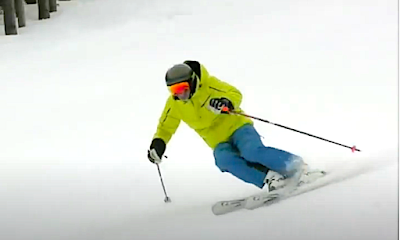
For the course set in Alta Badia, a racer needed to achieve an angle like the one above to make the ski perform well. Notice how the medial angle of the ski boot in this photo is touching the snow and the ski is at almost 90 degrees to the surface. This angle is much more in line with the top photo on the left which creates a turn that holds well and accelerates the racer down the slope.

Friday, October 15, 2021

The world's "Best Skiers" ski with the world's most efficient technique.


 When learning to ski with “PMTS Direct Parallel” ™ you end up with the same technique as Hirscher. Without trying anything special and skiing my normal turns, the technical elements of these two techniques are exactly the same. I knew nothing about Hirscher or his technique when I wrote my books, “Anyone can be an Expert Skier” and the “Essentials of Skiing.” He is 29 and I am 71 in these photos. Hirscher uses the most efficient ski technique I have ever seen in my coaching career. With efficiency, you can ski for the rest of your life, with less fatigue, complete control, and more fun.


Wednesday, April 14, 2021

Skiing April's light powder, Arapahoe Basin


                                                    https://youtu.be/PgBJzchAj8w


Saturday, February 27, 2021

Skiing traditions: Debunked and Explained! 1st in a Series, by Harald Harb

Just a short history: 

The transition in skiing has been misrepresented or not described correctly in ski literature since the beginning of time. In fact, in Warren Witherell's two books, it is never addressed at all. George Joubert, the French coach, in the late 60s and early 70s,  wrote two books. In them he does address the transition, however his descriptions are incorrectly focused.  I can make that statements because skiing at the highest levels has evolved differently from the way Joubert described it. Many so called ski technicians even today reference these books as the "gospel" never looking to evolve or properly analyze skiing after Joubert. Therefore ski teaching has stagnated since. 

In this series I will explain and break down how 21st Century skiing works at the highest levels and how recreational, intermediate and advanced skiers can add significant improvements to their skiing enjoyment and performance. With these methods and approaches you will ski with more efficiency, control and ease, rather than fighting gravity. You will learn to enjoy relaxation and the ease of acquiring ski performance with less effort. Let's get into it!

The Transition

The Transition is the most complex part of ski turns and requires the biggest change in the body. In the transition, your lower body, from below the hips, moves downhill, and the upper body stays the same until the lower body engages the skis to the new edge angles. Once this is done, the upper body needs to move from one side to the other over you skis. Ideally, this is accomplished without a pivot or and effort to create direction change. Once in the arc or a turn, the movements are relatively simple and consistent with how you stand on the ski. The transition is the point at which, everything happens, all this
changes and you move from one ski to the other and from one turn to the other. The best free skiers and racers can get this done before they reach the fallen. Let's have a look at the basics. 

     For the first session of body movements in this series; I focus on lower the body.       

To achieve a good transition, you have to have the skis engaged, not slipping, and the inside leg bent more than the outside leg. This happens with inside flex bending and tipping. Also, the upper body needs to counter-act the turning forces, called counter-acting. More on that later.


Through the bottom of the turn continue building your angles to load the outside ski. Many skiers give up the turn too early and therefore are rushed, therefore never getting the lower body released.


The actions of the release have begin already in this photo. The outside leg has shortened through bending  and lightening the pressure. How do you lighten pressure? You physically retract or pull the ski and knee up. Photo below.


The red arrow is the movement to retract. The blue arrow is getting that ski released.         The black arrow is where your balance and pressure goes when you create these     movements.


Now the tip of the ski is lifted, both knees are equally bent and the angles from the previous turn are gone.


The skis are flat, and half way through the transition. Notice nothing else has moved, only the lower leg flexing and bending up toward my chest,  has created the transition. Now both legs have the same amount of bend.

The lower body transition is complete, now you build the actions for the arc. The inside leg keeps bending and tipping,toward its outside little toe edge of the ski, until it is shorter than the outside leg.


The red arrow is for continued action of bending and flexing. The yellow arrows are
to indicate increased tipping.   Never push against the outside leg, common
error tau
ght to skiers.


In the turn, all is good.

Keep a look out for the second article in the series where I address the upper body responsibilities in transition.

Sunday, January 10, 2021

One of the 5 "Essentials of Skiing" Counteracting!

If "Carving" is one of the things you want to achieve in your skiing, then "Counteracting is a big contributor to that skill. In this post, I define some of the key ways to learn how to achieve and develop CA.


 The Yellow line curve is the arc of the turn. The two blue arcs are movements you make while in the arc, starting at the top of the arc and moving the arm and hand forward toward the tip of the ski until the end of the turn. 


Notice the ski pole tip is also moving downhill and in a circle as much or in advance of the skis coming through the arc. 


When you begin to learn how to use counteracting it may not work its way down to your hips where you see the red arrows, at first. (photo above)


This is difficult for many skiers to create hip CA due to either lack of awareness or flexibility. With practice, you can increase your hip support for your turns.


The forces in a carved turn want to rotate your torso, which decreases ski angles and edge hold. This is the reason to develop CA movements. Just trying to hold a countered hip isn't enough. Counteracting, or CA is a movement, not a position. 


Begin by using the pole tip, arm, and hand on the inside of the arc, to develop your CA movements through turns. Slow down, and pick a relatively flat slope to practice this. Make the movements from the top of the arc all the way to the end. This requires effort and patience, it won't happen immediately but it will pay off with great skiing if you stick with it.